

The self balancing scooter or hoverboard is the new cool thing to own. If you do not want to spend a lot of money on buying a self balancing hoverboard, you can make your own homemade hoverboard. Let us have a look at the steps to make a homemade hoverboard.
Step 1
Your first step is to have wheels. You can get them from a child’s bicycle. Once you get the wheels, remove any bolts around them.
Step 2
Now, you need to cut a frame of your hoverboard using durable plywood sheet. The size of the frame will decide the amount of space you have for your feet, so cut according to the requirements.
Step 3
Make a slot to place the battery onto the frame.
Step 4
Now you need to dig the holes into the wheels. Create an axle of wood.
Step 5
Attach the wheels to the axle of timber on both sides using epoxy. Make sure to use a good amount of high-quality epoxy in it (not from the dollar store) to give extra strength to the axle.
Step 6
Now, you need to start assembling the frame. Make sure that your frame looks like the one you already made and similar in size.
Step 7
Build another frame similar to the one you already built. This part of the frame will go on top in the later steps. This way the battery and other assembly gets nicely tucked in between the two frames.
Step 8
Now, you need to attach the smaller balancing wheels below to make it safer to ride. You can get these wheels from old washing machine or TV trolley. Make sure they are not broken and in perfect working order.
Step 9
In the next step, you need two high powered motors complete with their drive system. The drive system will connect the motors to the wheels. Each motor will drive each of the wheels.
Step 10
In this step, make motor brackets using the wood available. These brackets will help hold the motors to the wheels on the inside.
Step 11
In the next step mount the brackets by attaching them to the frame so that the motors connect to the wheels.
Step 12
The next part is a bit tricky. You need to wire the motors with the battery so they can get current. Remember that we are using two DC motors. You must match the voltage of the battery with the motors. Take the size of the motors which fits your frame.
Step 13
Now, put the second part of the frame on top so that all the assembly, motors, battery, and wiring hide between the two frames.
Step 14
Add elastics between the motors and wheels’ wooden axle. It helps keep the motors attached to the wheels, making the drive system work correctly. If the motors move away from the wheels, you need to add more elastic.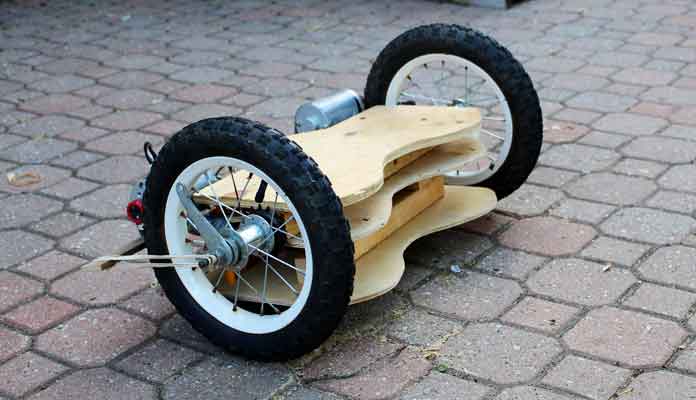
How to Ride a Hoverboard?
You need to put your one foot on the hoverboard first and then the second one. Make sure that you remain steady on the hoverboard when it starts moving. Do not make any sudden moves. Try to ride it slowly in the beginning. Always wear a helmet to enjoy a safer ride. Turning on a hoverboard is tricky so do not do it hastily.
How Does a Hoverboard Work?
The hoverboard works when you stand on it. Your body weight attaches the motors to the wheels, prompting it to move forward. The pressure you apply will make the hoverboard move forward. It is a homemade hoverboard, but a sturdy one with the use of woods.